初始化项目
安装 Vite
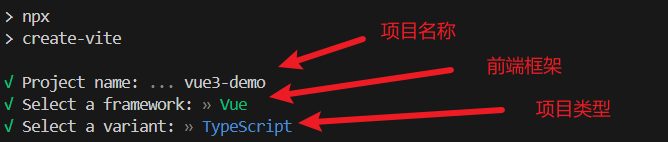
首先,确保你的 Node.js 版本 >= 12.0.0。然后在命令行中运行以下命令来创建一个 Vite + Vue 3 + TypeScript 的项目模板:
进入项目目录
创建完成后,进入项目目录:
启动开发服务器
在项目目录中,使用以下命令启动开发服务器:
项目结构
以下是项目的基本目录结构:
1
2
3
4
5
6
7
8
9
10
11
12
13
14
15
16
17
18
| ├── publish/
└── src/
├── assets/ // 静态资源目录
├── components/ // 公共组件目录
├── hooks/ // hooks函数目录
├── plugins/ // 插件目录
├── router/ // 路由配置目录
├── store/ // 状态管理目录
├── styles/ // 通用 CSS 目录
├── utils/ // 工具函数目录
├── views/ // 页面组件目录
├── App.vue
├── main.ts
├── tests/ // 单元测试目录
├── index.html
├── tsconfig.json // TypeScript 配置文件
├── vite.config.ts // Vite 配置文件
└── package.json
|
TypeScript 配置
安装 Node 类型定义
如果你需要在项目中使用 Node.js 的类型定义,你可以安装 @types/node:
1
| npm install @types/node --save-dev
|
或者在 tsconfig.json 中添加:
tsconfig.json
以下是 tsconfig.json 的配置内容:
1
2
3
4
5
6
7
8
9
10
11
12
13
14
15
16
17
18
19
20
21
22
23
24
25
26
27
28
29
30
31
32
33
34
35
| {
"compilerOptions": {
"target": "esnext",
"module": "esnext",
"moduleResolution": "node",
"esModuleInterop": true,
"strict": true,
"jsx": "preserve",
"experimentalDecorators": true,
"allowSyntheticDefaultImports": true,
"sourceMap": true,
"baseUrl": ".",
"types": [
  "node"
],
"paths": {
"@/*": [
"src/*"
]
},
"lib": [
"esnext",
"dom",
"dom.iterable",
"scripthost"
]
},
"include": [
"src/**/*.ts",
"src/**/*.vue"
],
"exclude": [
"node_modules"
]
}
|
路由配置
安装 Vue Router
安装 Vue Router 4:
1
| npm install vue-router@4
|
配置路由
创建 src/router/index.ts 并添加以下内容:
1
2
3
4
5
6
7
8
9
10
11
12
13
14
15
16
17
| import { createRouter, createWebHistory, RouteRecordRaw } from 'vue-router'
import HelloWorld from '../components/HelloWorld.vue'
const routes: Array<RouteRecordRaw> = [
{
path: '/',
name: 'HelloWorld',
component: HelloWorld,
}
]
const router = createRouter({
history: createWebHistory(),
routes
})
export default router
|
在 main.ts 中使用路由
在 src/main.ts 中添加以下代码来使用路由:
1
2
3
4
5
6
7
| import { createApp } from 'vue'
import './style.css'
import App from './App.vue'
import router from './router'
const app = createApp(App)
app.use(router).mount('#app')
|
状态管理
安装 Pinia
安装 Pinia 作为状态管理库:
在 main.ts 中使用 Pinia
在 src/main.ts 中添加以下代码来使用 Pinia:
1
2
3
4
5
6
7
8
9
| import { createApp } from 'vue'
import './style.css'
import App from './App.vue'
import router from './router'
import { createPinia } from 'pinia'
const app = createApp(App)
const pinia = createPinia()
app.use(router).use(pinia).mount('#app')
|
样式预处理器
安装 Sass
安装 Sass 作为 CSS 预处理器:
安装 Element Plus
在项目根目录下打开命令行工具,运行以下命令来安装 Element Plus:
1
| npm install element-plus
|
完整引入
一次性引入 Element Plus 的所有组件和样式,在 main.ts 文件写入:
1
2
3
4
5
6
7
8
9
10
11
12
13
14
| import { createApp } from 'vue'
import App from './App.vue'
import router from './router'
import { createPinia } from 'pinia'
import ElementPlus from 'element-plus'
import 'element-plus/dist/index.css'
const app = createApp(App)
app.use(router)
app.use(createPinia())
app.use(ElementPlus)
app.mount('#app')
|
一般不推荐这种写法,因为打包后的文件太大,下面介绍官方推荐的方法
按需引入
如果你想要按需引入 Element Plus 的组件和样式,你需要安装额外的插件 unplugin-vue-components 和 unplugin-auto-import 来实现自动导入。
首先,安装这两个插件:
1
| npm install unplugin-vue-components unplugin-auto-import -D
|
然后,在 vite.config.ts 文件中配置它们:
1
2
3
4
5
6
7
8
9
10
11
12
13
14
15
16
17
| import { defineConfig } from 'vite'
import vue from '@vitejs/plugin-vue'
import AutoImport from 'unplugin-auto-import/vite'
import Components from 'unplugin-vue-components/vite'
import { ElementPlusResolver } from 'unplugin-vue-components/resolvers'
export default defineConfig({
plugins: [
vue(),
AutoImport({
resolvers: [ElementPlusResolver()],
}),
Components({
resolvers: [ElementPlusResolver()],
}),
],
})
|
这样配置后,你就可以在组件中直接使用 Element Plus 的组件,而不需要在每个文件中单独导入。
附:

- 在ts文件里会出现导入 vue 文件后,提示 找不到模块‘xxx.vue’或其相应的类型声明
解决方式:
在项目根目录新建一个 xx.d.ts
1
2
3
4
5
| declare module '*.vue' {
import { ComponentOptions } from 'vue'
const componentOptions: ComponentOptions
export default componentOptions
}
|